Digital
Painting has never been
so much fun: Learn to
paint with Particle Brushes!

PD
Particles - $19
A fun companion for your
digital
photo image editor!
powered
by Project
Dogwaffle

|
into 3D: draw
a shape, and see it
automatically turn it into 3D
Archipelis
Designer
cool
tool for rapid 3D model creation and prototyping from images
|
Getting
started with Digital
Art on a tight budget?

PD
Artist - only $39
Draw,
Sketch, Animate & Paint
powered
by Project
Dogwaffle
|
|
A
tutorial to create this animation and save it as a screensaver
|
|
|
|
|
The Tutorial
|
Part 1: Getting Started
|
For this tutorial,
we'll be starting with a pre-existing image in Jpeg format. It may have
come from your cell phone's digital camera, or soemthing you painted in
Dogwaffle or another source. We'll be using an image created by Mark Hamilton,
named Dark Snow.
Opening a
Jpeg Image
When you use the File>Open dialog to open an existing image from
file, Dogwaffle first looks for image files of the TARGA file format:
*.tga
In order to see the Jpeg image files as you navigate through the file
system, you'll want to switch the 'file type' to 'Automatic'
which can detect and over 60 image formats, thanks to the image
conversion facility from ImageMagick which is included in PD Pro and
several prior versions (but not in the freeware version 1.2)
 |

Select the desired image and open it.
|
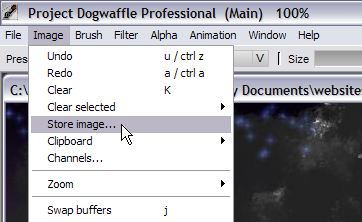
Store the
Image
Once you have loaded the image, you might want to immediately store it.
That will grab a snapshot of the current image buffer in memory. It
won't save it to disk but it will have it like a backup snapshot in
memory for quick and easy restoration if you want to re-use it.

PD Pro doesn't let you work on multiple documents at the same time,
i.e. it is not multi-document enabled. However, given that you have
only one mouse and only one place to click and paint at any moment in
time, the ability to store multiple images sure comes close to the
needs of artists who think in multiple projects at the same time.
|
Resizing
& Resampling
In the same Image or Buffer menu you'll find the Resample... option. It
lets you resample the image to higher or lower resolutions, all the
while resampling it so things don't get to look too blocky or pixelated
too easily.

We'll reduce the size of the image to 640x480 pixels for this
exercise. The goal is to have something that's about half to a quarter
the size ofthe target resolution. If the screen is expected to be
1024x768 or 1280x1024 in resolution, this will work nicely. In
fact it will also work for higher-resolution, larger screens such as
the 22" monitors which reach 1900x1400 resolutions or similar, but of
course it will look much better if you use a higher resolution for more
detail. The question is whether your computer will be able to handle
the bandwidth to push the animated image sequence of the screensaver
we're creating, pushing the images perhaps at 20 frames per second
through the system bus into the graphics frame buffer.
|
Making
the window larger to see the border around
 We
may want to do some painting or selecting at or near the borders of the
image. It may be helpful to have extra space around the image and the
window decoration. Grab a corner of the imagge buffer's window and make
it larger. This will reveal the grey zone around the image. You can't
really paint in it but you can still use it as part of a selection as
we'll see next. We
may want to do some painting or selecting at or near the borders of the
image. It may be helpful to have extra space around the image and the
window decoration. Grab a corner of the imagge buffer's window and make
it larger. This will reveal the grey zone around the image. You can't
really paint in it but you can still use it as part of a selection as
we'll see next.
|
|
next
step: making
selections in Alpha channel
|
|
|
|
|
|


