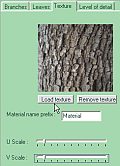
applying a texture to the
trunk and branches:
|
The information shown herein is
in part based on the Help file included with the program and shown here
for information so that you may get a good idea of what
TreeGenerator 2 can do and how you might want to use it.
What is TreeGenerator ?
TreeGenerator is a standalone software to create realistic 3D models of
trees. You can create a tree mesh, its textures, and export it in
various fileformats. You are then able to load your trees in most of 3D
renderers or realtime 3D engines. TreeGenerator 2.0 allows to export in
3DS, OBJ and DXF, which cover the most important fileformats.
TreeGenerator is aimed at artists as well as architects or game
developpers who want to get realistic trees to their virtual world.
Getting started
When starting TreeGenerator, a simple leafless tree is created
automatically. You'll then modify this tree.
You have to know that a tree is composed by a trunk, which will be
considered as a "first level branch", which then gets divided in
several branches of second order, each of them beeing divided in
further order branches. We'll then consider that a branch has several
"children" branches, and a unique "parent" branch. The number of
subdivisions which are done to create the tree is controlled by the "Nb
Levels" slider. Setting it to 1 only create the trunk, and the tree
complexity increase exponentially with this parameter. You'll find more
informations in the User Interface
section.
Then, each level of the tree is controlled by several branch
parameters. Each level can be controlled individually by the tab
assigned to it. The tab called "1" correspond to the trunk, thus having
less parameters control than the other subranches (tabs "2", "3" ...).
After having played with several branch parameters, you'll
find it useful to add leaves. Go to the "Leaves" tab. You'll find an
empty area with a cross inside. The center of the cross represents the
attach point of the leave on the branch. Just click at least at 3
different locations in this area and you'll get a 3 point leave. You
can then move your control points and/or add new ones to get a complex
leave. You can drive your leave drawing by placing a leave texture on
the area and click on the contour of the leave to get an even more
realistic leave with an appropriate texture.
You'll then enjoy adding a bark texture on the trunk and
branches by going to the last tab called "Texture", loading a .jpg or
.bmp file and tiling it interactively.
When you have a decent tree, save it as a TreeGenerator file
using the File->Save as... menu, or export it in .3ds for example in
the File->Export... menu.
User
interface and tips
|
interactive preview
powered by OpenGL
|
|
Section A
This part of the user interface (UI) is aimed at moving around the
tree. You can thus rotate or translate the camera atound the tree, and
reset the viewpoint to its initial position.
 You
can also control the camera by using the arrow keys on your keyboard
and dragging your mouse over the "G" area. You
can also control the camera by using the arrow keys on your keyboard
and dragging your mouse over the "G" area.
Section B
- Show plane :
Disable/Enable the rendering of the green floor.
- Wireframe :
Using this checkbox, you can enable/disable wirframe rendering of your
tree. Wireframe can be faster to render than full shaded rendering, and
it allows you to see through your tree.
- Hide Leaves
Checking this box hide the leaves of the tree. If tree has no leaves,
this checkbox has no effect.
Section C
Here are the stats of your trees. The number of submeshes relates to
the number of sub-objects or objects which will be created when
exporting your tree. Its value is the sum of the number of leaves and
the number of branches.
While
TreeGenerator allows you to export a detailed tree with lots of
sub-objects, most of modeling/rendering software add tools to group or
attach all these subobjects if you don't need them to be separated. For
example, you can use the tool Polygons->Combine in the Modelling
part.
If
you intend to produce trees for games, try to keep the number of faces
and vertices low. A billboarding feature will soon be added for maximum
polygon reduction.
Section D
- Branches tab :
- Nb Levels :
It controls the number of times the trunk recursively get subdivided. A
value of 1 only lets the trunk, while increasing this value increases
the tree complexity.
Except if you have a really
powerful computer, you'll only get realtime tree generation for up to 4
levels, nearly interactive generation for 5 levels, and offline
generation for 6 or more levels. In this case, make sure to uncheck the
"AutoUpdate" checkbox in area "E". (see later).
- Trunk width / Branch
width :
A radio button and a slider control the radius of the branch. The value
of the radius can be a fraction of the parent branch radius, expressed
in a percentage value, or by a given absolute value, depending on the
radio button state. By the way, as the trunk doesn't have any parent,
the "Constant/Inherited" radius property doesn't have any effect on the
trunk radius (ie. on the level 1 tab), so Inherit is disabled.
- Trunk length / Branch
length:
In a same way as the radius (seen previously), the length of each
branch can be constant or inherited. The inherited property still
doesn't have any effect for the trunk and is also disabled for trunk.
- Increase taper :
It controls the linear part of the decrease of each branch, ie. its
conic aspect. Increasing this value too much results in a swapping of
the cone...
- Inflate/Deflate :
It controls the exponential part of the decrease of each branch, ie.
its "funnel" aspect.
- Twisting freq. :
It controls the twisting frequency of each branch, ie. the number of
twists a branch will do around itself.
For a good twisting quality,
increase the quality of the branch along itself, ie. the Quality
(height) value.
- Twisting rad. :
It controls how far away from the center the twisting goes.
- Bending upward :
Like in reality, each leave tend either to bend toward earth due to
gravity, or to bend toward sky due to heliotropism, ie. their
attraction for sun. You'll control this parameter with this slider. It
is one of the most important parameters since it controls the nature
behaviour of the tree and thus greatly its shape.
- Noise :
As branches aren't perfectly smooth, a random noise factor has been
added, which randmoly displace each vertex.
- Attach to parent :
It allows a branch to be attached to its parent branch by the closest
points of its parent. If the closest point is too far away (ie. the
quality in height is too small), it will creates noticeables
distortions. In this case, either increase the quality of the parent
branch, or uncheck this button. As the trunk has no parent, this
property is not shown for the trunk.
- Quality (angle) :
It allows you to change the discretization of the branch around itself.
A value of 3 will create prism-like branches while high values will
make them smoother. For high level values, branches are so thin that
this parameter can be significantly reduced without loosing quality.
- Quality (height) :
It allows you to change the discretization of the branch along itself.
A value of 2 allows you to only create simple conic branches whil
higher values increase smoothness.
- Leaves -> Density :
You can control the density of leaves for each branch level. If the "no
leaves on trunk" option is checked in the Leave panel, the leave
density slider won't have any effect for the level 1.
- Leaves -> Scaling :
You can set a scaling factor for the leaves of each branching level.
- Nb of children
(min/max) :
You can specify a lower and upper bound of the number of children each
level has. A random number of subranches between theses 2 values will
be chosen.
If you want a constant number of
children, you can specify the same value for theses 2 parameters.
- Height (min/max) :
It represent the position of the subranches along this branch. A
min/max interval allows the parameter to be chosen randomly. Moreover,
if "Height relative to previous child ?" is checked, the position will
be determined relative to the previous generated branch. It can be
useful if you want a constant interval between the branches : just
specify a small value for both height parameters and check "Height
relative to previous child ?".
- Angle (min/max) :
In a same manner as "Height", it controls the angle of the branch
around the tree.
If you want to get a spiral
staircase like tree, you can specify lots of children, a small height
interval and a small angle interval and check "Height/Angle relative to
previsous child ?".
In nature, the arrangement of
leaves is known as "Phyllotaxis". A well known case is derived by the
golden number (approx. 137.51° ) which reveals to be a common angle
between leaves. You can try this case by setting 138 degrees in the
branch angle, checking "Angle relative to previous child ?", and
setting a small subbranch with leaves. Another common distribution is
derived from Fibonacci numbers but can't be easily done here yet.
- Inclination (min/max) :
In a same way, it represent the "vertical" angle of branches. 0 degree
means perpendicular branches (if no bending is done).
- Leaves tab :
-
"draw
area" :
In the "arrow" mode :
You can draw a leaf by clicking on the white area (at least three times
to get a triangle leaf) thus creating control points. Each click adds a
control point at the end of the current shape, and the shape is
automatically closed. You can also move control points by dragging them
on the area. The cross represents the attach point of the leaf on the
branch. This leaf will be replicated all over the tree.
In the "mouse" mode :
Dragging the mouse on this area let you translate a loaded texture.
-
"Clear
points" button :
Clears all the already made points of the leaf model.
- "Load texture" button
:
Loads a texture (jpg or bmp) which will allows you to drive your leaf
drawing. You can then click on the contour of the leaf and get a more
realistic leaf shape. It also allows to have a texture on your leaf.
Without any texture, leaves will be rendered green.
Warning : To get the correct
texture representation (ie. UV coordinates), you have to choose
textures which size are power of 2 (for example a 256x512 texture).
Tip : Most rendering algorithms use
texture filtering. It means that your leaf texture can have a white
border while rendering (due to mipmapping for example). It is an
artifact which can be avoided in two ways : you can draw your leaf
contour largely inside of the leaf, or you can fill the leaf background
with a color similar to the one of the leaf. See leaf texture samples
to get a clearer idea.
Tip : Whereas transparency is not
correctly handled in the file export, you can create a transparency map
corresponding to a leaf or a set of leaves, and only draw a quad which
will handle your texture. You'll then be able to set your transparency
map in your favourite modeling software. This method allows you to
create trees with less polygons since a set of leaves can be
represented with a single quad with transparency instead of a complex
geometry. On the other hand, as Tree Generator doesn't yet handle
transparency for leaves, you won't be able to calculate correct
billboard clouds since they will be computed without leaves
transparency.
- "Clear texture" button
:
Clear the texture to get a white drawing area, and standard green
leaves.
- rotate/translate(x)/translate(y)/scale
:
Let you adjust the position/scaling of the texture, for example to get
the base of the leaf texture correspond to the central cross.
You can also translate the texture by clicking on the "mouse" button,
and dragging the texture directly.
- "No leaves on trunk"
checkbox :
Force the tree not to get leaves on trunk.
- Texture tab :
-
"Load
texture" button
Allows you to load a texture for the trunk and branches (.jpg and .bmp
recognized). Without any texture, branches are rendered brown with
slight variations.
- Material name prefix :
Useful for the export, it allows you to prefix each material name
(there will be one material for branches, one for leaves) to make your
tree materials unique.
Some softwares (like Maya)
automatically make material names unique when importing objects...
- U Scale/V Scale :
Allows you to stretch or tile your texture on the tree.
- Level of detail
You can here create a billboard cloud. A billboard cloud is a sparse
representation of a tree consisting in a set of quads with proper
textures. The simplest non trivial billboard cloud will then be a
"cross tree" consisting of 2 quads perpendicular to each other with the
shape of the tree drawn in it. You can see this kind of trees in games
where forests can only be rendered in realtime with a few polygons per
tree.
- Nb of billboards :
Whereas you can't specify precisely the number of generated quads, you
can still have a rough control over it. Increasing this value will make
more but smaller quads. Since fillrate is an issue, increasing this
value too much won't give you an increase in the rendering performance
of your tree. Moreover, increasing this vale will slow down the
computation.
- Precision :
It controls how well your tree is represented with the set of quads.
The more this value, the more the computing time.
- Favour vertical planes
:
If you want to create a forest walkthrough games, creating a lot of
horizontal planes can be unnecessary. Checking this box enforces
vertical planes, fronting a walkthrough camera.
- Geometry vs. Billboards
It is recommended to create such quads only for leaves, and to keep a
standard geometry for trunk and branches (you can still create levels
of detail of branches by decreasing their quality in angle and height).
Nevertheless, you can also create billboards for branches if you want
to.
- Texture Resolution :
It controls the overall texture size to store all small quad textures.
- Texture Quality :
It controls for each small quad texture, the quality of the rendering.
Setting it to high can cause memory overflow.
- Create Billboard Cloud
Launches the computation of the billboard cloud. This computation can
last a few minutes depending of the settings and you configuration.
Once the billboard created, you won't be able to modify tree
parameters.
Section E
You can click on the 'Generate' button to
re-generate the tree (will have no effect if "AutoUpdate" is checked).
The AutoUpdate checkbox allows interactive modifications of parameters
while unchecking it will improve tree generation performance (useful
for complex trees which require a lot CPU). The seed parameters allows
you to create mutiple similar trees which have the same set of features
but a different randomness. You can then create different trees of the
same species
Section F
File->New
: restart a new tree from the beginning.
File->Save
as... lets you save the parameters of the trees in a .tgf file
which can then be reloaded in TreeGenerator.
File->Save
: it's a shortcut for Save as to avoid resetting the filename each time.
File->Export
: Let you export the mesh of the tree in a file for importing into
other softwares (Maya, 3DSMax...). It handles 3DS, OBJ and DXF files
which cover the most common fileformats.
Warning : DXF fileformat doesn't
handle texture coordinates : you'll get an untextured tree. OBJ is an
ASCII file (which means composed of strings of readable characters)
which make your file heavy. It also generates a material file which
extension is .MTL. That's why we recommand you .3DS fileformat whenever
possible.
Textures are not coded inside the
files, only their path. Whenever redistributing a tree, pay attention
to include the proper texture files.
File->Export
Screenshot : Allows you to export a screenshot of the current
window (for illustration purpose for example).
File->Export
Billboard : Exports the current generated billboard cloud in
3DS, OBJ and DXF.
Warning : textures are saved in a
*Texture.bmp and a *Transparency.bmp files which correspond to the
texture and transparency map of the billboard. Nevertheless, the
billboard exported doesn't have its transparency map assigned.
Assigning the transparency map is just a simple step that you will be
able to do in your modeling software.
Tools->Bark
Tiler : This is a small tool which allows you to create tileable
and borderless textures. You can load a bark texture, crop it, remove
the shading (warning : setting a too low value in the slider will cause
severe degradations since all small shading features will be subtracted
from the image, and setting a too large value will make it slower),
symetrize the texture (which will make it tileable), and make it power
of 2.
FAQ
- When a tree is
done, can I freely share my trees ?
Of course, whatever tree you create with TreeGenerator belongs to you.
You can do whatever you want with it.
|
Getting
started with Digital
Art on a tight budget?

PD
Artist - only $39
Draw,
Sketch, Animate & Paint
powered
by Project
Dogwaffle
|
|


