

how to model a sphere and take it beyond

 |
| Getting
started with Digital Painting on a slim budget:  PD Artist now 19! Draw, Sketch, Animate & Paint powered by Project Dogwaffle
|

 |
| A
sphere is a marvellous object to study some of the many features that
Curvy 3D has to offer when it comes to painting onto the 3D objects, be
it to define the color maps, add transparency holes through the alpha
channel, defining highlight maps, bump maps or even real-time
displacement maps, called Curvy maps. But how do you start making a sphere in the first place? And I mean, a perfect sphere. Creating the Perfect Sphere Here's a quick tutorial to get the sphere, and then some experiments with painting on it.  We will draw a profile of the sphere, just half of it, actually. Just a semi-circle will do, such as the left half or right half. We will use the Lathe tool so that the circular arc will be swept around the vertical axis. Start by using the Lathe creation tool. Use a single view, perhaps the Front or Perspective view, and make sure you're reset the view. Start fresh from scratch if you're not sure how to. Or click in the upper-left corner of the view: click on the name of the view (such as Perspective or Front) and you will see a menu with, amongst other things, a Reset View option as well as Reset All Views.  Now, with the Lathe tool selected, just draw a semi-circle like the one below. Now this will only be an approximation. Don't worry about it not being perfect. click image to enlarge

Ok, so we've drawn one long
brush stroke. The Lathe tool normally expects you to draw another line.
Instead, we will now want to select this first curve we just drew.
Right-click the object to locate and select the curve.
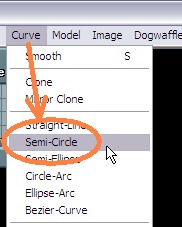
 With the curve now selected,
you can have it reshaped with one of the
modifiers from the Curve menu. Select the Semi-Circle option:
  You may also need to resize it or zoom in. Here you go, a nicely shaped
perfect sphere. If you switch back to
multiple views you can reset (center) them each and easily get to about
this look:
 And here's another version, a look at the same ideas through this video: view it from screenr or
youtube below:
Next: Working with Base Color Maps |
| Spheres
Tutorials |
| Drawing
a Sphere |
| Base Color Maps |
| Bump
Maps |
| Displacement
Maps |
| Beginner
Tutorials |
| Photoshop 3D Layers |
| Bones
101 |
| Teapot |
| Dogwaffle 101 |
| Teapot Confetti |
| Renaming &
Grouping |
| Booleans |
| Web Graphics |
| Smooth |
| Monkeyfaces |
| Straight Lines |
 |