|
| Products | Features | Sales | What's New | Download | Support | Tutorials | Newsletter | DOTM | About | ||||||
|
||||||
More Landscape tutorials | even more tutorials |
||||||
With Dogwaffle, whether it's PD Howler, or PD Artist, you have a layering system but you might not use it. There are other resources, such as the alternate image, called the Swap image. Or the selection mask, a global one (not one per layer, at least not at the time of this writing).
Still, you sometimes will want to save some of these image resources into a single file. The Main image, the Swap image, and the alpha mask (the selection mask). You can save these into a single file by using the layered format, even if there are no additional layers.
One place where this comes in handy is when you're working on landscapes that you edit, by making changes to the height map, or elevation map. This will usually be in your main image. And you may also have a coloration which may vary by elevation and/or slope. This is usually kept in the Swap image. If it comes from using the 3D Designer module, it's the texture map.
The End Result: a .lyr file
Here's an example of a .lyr file, uncompressed, ready to be opened in Dogwaffle. Feel free to grab it and play with it.
saved-Main-and-Swap-in-one-file.lyr (size: 6 MB)
This following one even has a selection mask:
saved-Main-and-Swap-images-plus-the-selection-in-a-single-file.lyr (size: 6 MB)
Please note: this format is not compressed. It will be big files on disk. You could archive old ones into smaller size by compressing them with zip or 7zip. The level of compression will vary by the chosen options and the image content too.
Here's how to save both the current Main image, and the Swap image (and even the selection mask, if any):
A Short Version of the Tutorial:
Simply save it as ".lay" (layered) file. It saves the main image (and layers, if any PLUS the Swap image PLUS the alpha channel's selection mask.
The Detailed Tutorial, with extra Tips and Explanations:
You've created an elevation map. It is showing as the main image. You may also have a stored copy of that. This is optional. In the Swap image, you have the corresponding texture map. That one is not showing by default, though you can enable 'layer blending' to show the Main and Swap images blended together. (without merging them). Still, you likely also will have stored a copy of the texture map. Again, this is optional. What matters is that the heightmap is in the Main image buffer, and the texture map is in the Swap image buffer.
Sidenote: How to store an image:
In case you didn't know, you can store the currently displayed image from the Image menu, but also, and perhaps more conveniently so, from the mini icons near the top right zone:
(Next to that there's also an option to store the selection and the brush.)
Are you currently looking at the main image or the Swap image? You can see which one is currently showing, by looking at the top center title for the name of the program (Artist or Howler) and the zoom factor (e.g. 100%). Between the two values you'll see a short text in parenthesis: (Main) or (Swap).
You'll want to arrange for the height map to reside in the Main image, and the texture map in the Swap image.
Here's one of several ways to do that:
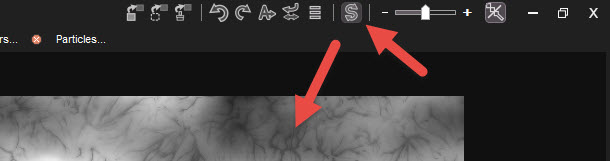
Not far from the 'Store image' icon near the top right, you also see a big 'S'.
It is a toggle to switch between the main image and the Swap image.
Use that to look at the Swap image. If you didn't place a copy of your texture map in there yet, it may be plain white. Or contain the image from prior activity. For example, if you used the 3D Designer filter, and changed the terrain color by enabling slope-based coloring (slope and elevation-based, actually), you will have the resulting texture map in the Swap image automatically.
After you switched to the Swap image, the top center title showuld show (Swap):
Then you can simply put the stored image of the texture map into the currently showing image buffer.
We're looking at the Swap image, so that's where it goes.
To do so, simply click within the thumbnail of the stored image,
and it gets to appear as the currently displayed Swap image.
Then you can switch back to the Main image, using the same "S" toggle .
Easy enough?
Ok, now we have the texturemap in the Swap image, and we see the elevation map or height map in the Main image.
If you wonder if the Swap image is still there too, you should know that you can easily enable a blended view, in which both are showing at the same time. There is a default Multiply mode, you could change it to Screen mode or other modes of blending. It doesn't matter though, this is only temporary: You simply click the right-most of the three larger icons in the Previews row of thumbnails. That top right preview shows the current image. If you click that icon, it goes into a mode that shows them both, in a blended mode. You can tell wen it is blending-enabled, just by recognizing a small orange triangle in the upper left corner of that thumbnail. Click the thumbnail once to turn it on an enable the blended view mode, and click it again to turn it off, and stop the blending. If this is new to you, you also will want to right-click that icon to learn about the other options. If you want to learn about the blending modes, check this tutorial which goes back a few generations:
Layer Blending Modes
http://www.thebest3d.com/howler/whatsnew/layer-modes/index.html
Ok, so now we have the desired image of the height map in the Main image,
and the desired colored texture map in the Swap image.
Now we can save them together in a single file:
Simply save it as .lyr (layered) file: File > Save... > Save as type: Layered format
And that's it. You can now exit Dogwaffle, and pick the images back up later, opening them from the File > Open... menu. The main and swap images will be restored, and the alpha mask too. Then it's back to painting over it, or using them for rendering in Puppy Ray.
Happy waffling & howling!