

FF 101 - the Basics
exploring the force field tools

 Load
an existing image, something with some form of shapes or distinct
patterns you can identify. Even something as randomly created in PD
Pro's filters such as Load
an existing image, something with some form of shapes or distinct
patterns you can identify. Even something as randomly created in PD
Pro's filters such as Filter> Render> Cold Lava I recommend using Image> Store Image... to stash away a copy for re-use. Having select a particle brush, such as the preset named Garland, click on the "FF" button to use the loaded image as the basis for a force field. After a few moments you'll see the interface panel: 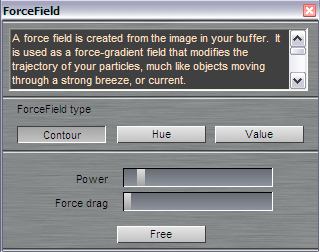 Scroll through the text box at the top of the panel, and read it. This will serve as a quick reminder of what it's about. Now, if you click "Free", the force field will be released and disabled. You can then close the panel. You can click "FF" again to return to the same forcefield (it will simply re-evaluate it, and if it's the same image it'll be the same forcefield)  Draw a stroke without the force field enabled.
Here's an example of a quick scribbly line from left to right, jut one
brush stroke! Draw a stroke without the force field enabled.
Here's an example of a quick scribbly line from left to right, jut one
brush stroke!^ click image to enlarge
This is a normal Garland appearance from the particle brush. Now, click the stored image of the cold lava or whatever  you want to use as a force field. Or load
the image again. Then, either paint a new brush stroke, or better yet, use Shift-A to again render the most
recent (prior) brush stroke. Or use the Stroke player from the
Animation menu to the same effect. you want to use as a force field. Or load
the image again. Then, either paint a new brush stroke, or better yet, use Shift-A to again render the most
recent (prior) brush stroke. Or use the Stroke player from the
Animation menu to the same effect.^ click image to enlarge
By using the same brush stroke you'll get a better idea of what happens with the presence of a force field, as you can compare side by side the before FF and after FF. Click the above images and compare. Evidently, there's already some wilderness happening with these particle paths, they appear less tamed, more erratic. The force field is intially set to rather low level.  If the presence of the image (cold lava)
that was used for making the forcefield is distracting, you can also clear the image and hit Shift-A again. If the presence of the image (cold lava)
that was used for making the forcefield is distracting, you can also clear the image and hit Shift-A again.^ click image to enlarge
More Power Now change the value on the first slider. The particles will be yanked around more forcefully. It's like they have a higher startup (initial) velocity. This is the strength at which the forcefield affects the particle's velocity.  ^ click image to enlarge
More (conducive) Drag The other slider forces the particles closer to the guiding lines of the forcefield, i.e. along the flux path. If the Power slider is reduced, and the drag is increased, you'll see the particles sort of tamely contained in their origination spot, not venturing very far away from where they started.  ^ click image to enlarge
More Force and More Drag! And now it gets really interesting, when you use both sliders for more force and more drag. Soon enough you'll start recognizing the shapes of the forcefield, i.e. the image that was used to define it.  ^ click image to enlarge
In the above example, we only used the first mode - Contour - to tell the system what aspect of the image to use for forcefield calculation and application. Instead of the shapes (which is what contour lines are correlated to), you could make it follow the Hue, or the Value (such as brightness). We'll see a few more examples later. But let's see an example of what you can now easily achieve, with just this one brush stroke, re-rendered a few times, with various parameter changes, including switching to other brush metrics that randomly place flowers over several layers of moss.  ^ click image to enlarge
That's it for a first intro, let's explore some more ideas soon. Here are a few more basics reminders for inspiration: |
| FF Resources |
| Intro |
| Step1: Basics |
| Examples |
| PD Pro 3.5 |
| Erratic animated fire |
| Portrait |
| Weed |
| Skull |
| what's cool |
