|
The Background Image
For the first image, which will serve as the background, you could of
course use something coming from your digital camera, or an image from
print which you scanned or something downloaded or found on your
computer, perhaps from the 'My Pictures' folder.
In ourcase, we'll use an image which is not from a real photo. It was
created in a free 3D program, Bryce 5.
Our Background image has a sky with clouds and a water surface as well
as some terrain with Mediterraen vegetation.
If you'd like to use the same image you can download it here: background1.zip [557 KB, zipped]
The image file it contains is a Tiff image of about 1.3 MB size. The
image dimensions are 800 x 600 pixels
|
|
Bryce
5.5 BOXED!
Original
price: $89.95
 Sale
price around $25 Sale
price around $25

|
|
 |
The Second Image
A second mage is needed. Perhaps you have a digital camera and shot a
cute picture of your dog or kitty. Or Johnny in his Halloween dress,
and now you want to composite that image over the background.
In our example, we'll use a simple drawing created with PD Particles. It was painted
with a few brush strokes, using a mode called 'Shrinking Lines+', where
the '+' indicates 'plus Alpha', which means that the image also has a
selection mask, in the alpha channel. The particle traces of the
foliage are thus contained in a selection mask, which will make it
easier for the background around it (or in-between some of its
branches) to appear transparent.
You can use this image if you like: sample1.zip
[950 KB] - again this contains a Tiff image
|
|
Digital
Painting has never been
so much fun: Learn
to
paint with Particle Brushes!

PD
Particles - $19
A fun companion for your
digital
photo image editor!
powered
by Project
Dogwaffle

|
|
 |
A side-note: When
saving
to Tiff, PD Particles automatically detected the presence of an alpha
channel (containing a selection) and saved it with the Tiff format.
If we had saved to the Default Targa format (*.tga files), we are given
the option of what color depth to use. We would want to use the 32-bit
depth, which saves the RGB colors and the alpha channel.
|
|
 |
Loading the background
into PSE4
Ok, here we go. Create a new document from the File menu of Photoshop
Elements. Or start by opening the backgrund image.
In this case we'll create a document of the same dimensions as we know
we'll find in the background image: 800 x 600 pixels.
|
|
|
 |
By default, PSE
shows all
files of all support image formats. If you're browsing through a folder
which is loaded with hundreds or thousands of pictures and image files
of many different formats, such as PSD, Jpeg, Gif, BMP, Tiff and
more... then you may want to trim your display options so that it only
shows images of file TIFF.
That will make it hopefully faster for you to locate and select the
desired image.
|
|
 |
Open another file,
i.e.
the second image. PSE will open it as a separate document.
You'll notice in the preview already that PSE thinks there's a
selection mask in the alpha channel and that it chould be used for
transparency. Thus, even though the background (of our foliage image
when we painted it in PD Particles) was black, the preview shows it as
white, which is the browser's background color.
|
|
 |
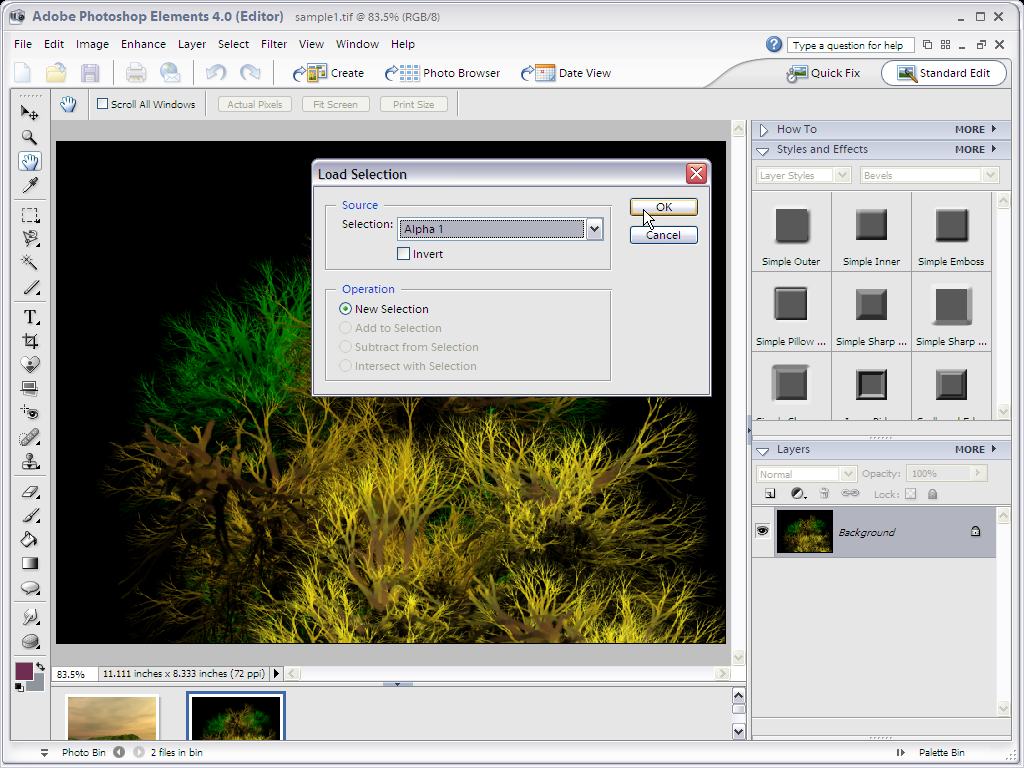
Creating a Selection
from the Alpha Channel
Now we have both images
loaded, in two separate documents: the background image, and the second
image, of the bushes.
With the bush selected as the current image (which is the case
automatically if we just opened that second image file), go to the
Select menu and indicate that you want to load the selection:
menu: Select
>
Load Selection...
PS Elements knows knows that there was something found in the alpha
channel of the image file. Now we're telling it that we want to use it
as a selection.
|
|
Getting
started with Digital
Painting on a slim budget:

PD
Artist now
$29!
Draw,
Sketch, Animate & Paint
powered
by Project
Dogwaffle
|
|
 |
In some other cases,
a
selection may be built or reconstrcted from a variety of sources. My
guess is that for example a PSD file or a multi-page tiff file might
contain more than one alpha channel mask. It would then make sense to
have to choose which source we want to use for that selection to be
created.
In our example, there's just one to choose from: the one and only alpha
channel that was found, and which is named Alpha 1.
Just click OK.
|
|
|
 |
There, now we see
the
traditional 'marching ants' highlight, indicating that there is a
selection in effect, al around the edges of the bush, based on the
alpha channel's mask.
The inside of the bush is fully selected (opaque), the outside is
deselected, i.e. transparent, the pixes of edges themselves go through
a smooth transition from selected to non-selected.
|
|
|
 |
Copy'ing the Image
through the selection Mask
With this selection in
effect, we can easily copy the image. We do this so that we may then
switch to the other image (the one with the background photo or
rendering) and paste this imaged into a new layer there.
Use the Edit>Copy command, or Control-C as a keyboard hortcut.
|
|
|
 |
We can now dismiss
the
document. You can either minimize it, or tile the two or more document
windows, or close this one.
I like to keep it handy, in memory, for a while longer, just in case I
need to get ack to it quickly. So I just minimize the image document, I
don't close/delete it quite yet.
|
|
Great
Animation Tools
2D
+ 3D Software
at lowest prices!
Carrara - Bryce -
Poser - Anime Studio - Manga Studio and more
|
|
 |
Creating a New Layer
Switch to the other document, which contains the background image.
We're going to want to place the bush image into a new layer.
Select the menu:
Layer > New >
Layer...
The keyboard shortcut Shift+Control+N
comes in very handy, learn to use it. I like to memorize it as
Contrl+Shift+N, since on my keyboard the Ctrl key is further down in
the lower-left, and that's where my pinky starts, then the ring finger
lands onthe Shift key.
|
|
|
 |
One more click and
we're
done with creating the layer. Click OK....
The new layer has
been
created:

It is of course empty. It is now ready to receive our second image,
which is still in the clipboard.
|
|
Inventory Blowout
Sale:

Poser 6 (boxed!) at
lowest prices:
for
MacOs
or Windows
|
|
 |
Image Insertion into
the Layer
Simply go to the Edit>Paste menu, or use Control-V.
That will paste the image into the current layer.
|
|
 |
And here it is.
And sure enough, only the opaque parts of the foliage pictre had
been copied to the clipboard and now pasted into this new layer. That's
because there was a selection mask, which had all opaque pixels enabled
(selected) and the background around it disabled (non-selected). The
Copy to clipboard took that into consideration.
The net result is that we now have both images in a single
multi-layered document.
|
|
|
 |
Image Transformation
It is now time to make adjustments to the new layer's image. We may
want to resize it, reposition it, rotate it etc... the free
transformation tool comes in very handy at this point.
Select the menu:
Image > Transform
>
Free Transform
or use the keyboard shortcut: Ctrl+T
|
|
|
 |
You can use the
control
points on the handles like those in the diagonal corners, to resize.
|
|
a great companion to
Project Dogwaffle:
AnimeStudio
is on sale!

Regular price: $59.95Sale
price: $39.95
(boxed!)
|
|
 |
The layer panel
should
show what's happening too. In our example here we've oved the image
near the lower-left and made it a little bit smaller too.
|
|
|
 |
|
a great companion to
Project Dogwaffle:
AnimeStudio Pro
is on sale!

Regular price:
$199.95
Sale
price: $179.95
>> free shipping available in the US!
|
|
 |
Perhaps we'd now
like to
have a different level of color or contrast on the background image.
Select the background layer and apply filters or whatever you're
typically doing at that time.
|
|
|
 |
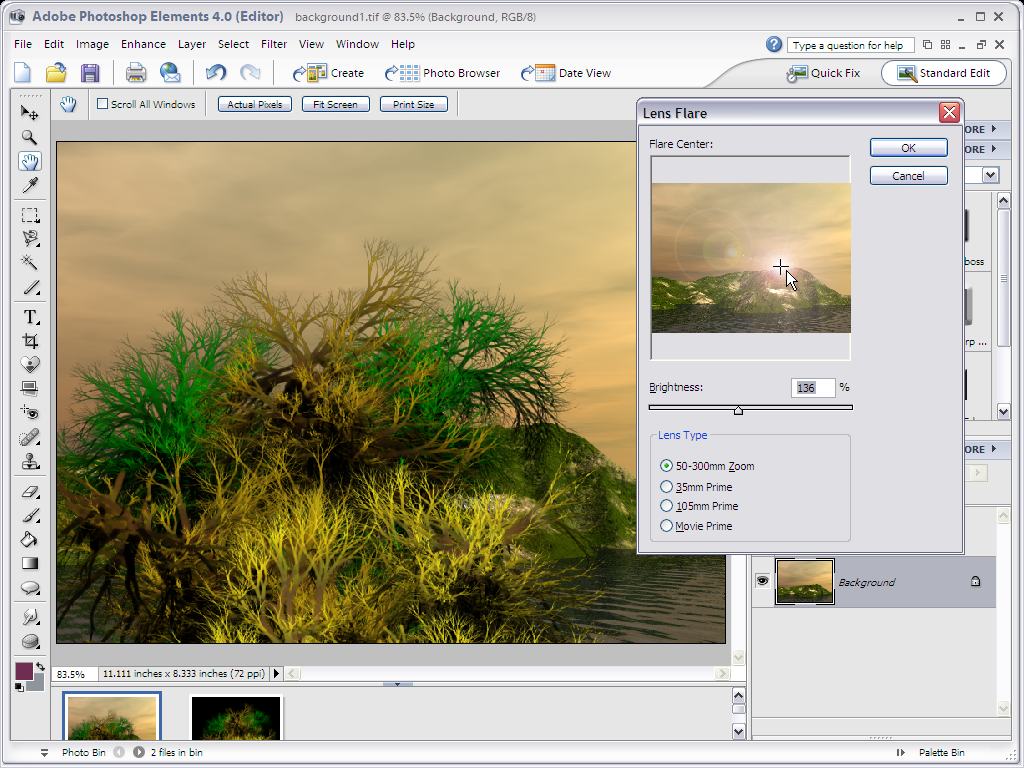
Another effect which
I
like is
to add a Sun there, a bright light with Lens Fares...
menu: Filter
>
Render > Lens Flare...
|
|
Finally! 3D for
everyone:
Carrara
(boxed)
free shipping
for
orders $50 and up! (US only)
Hurry
before
they're gone - this is a limited inventory blowout sale
around $17
Carrara
3D Basics:
so
affordable!

around $40-$50
Carrara
3D Express:
wow!

around $50-$60
Carrara
5 Standard:
best
value!

just around $100
Carrara
5 Pro:
be a 3D Pro now!

|
|
 |
You can set the
position,
the Brightness and lens type.
Other effects like different coloring of the bright bloom could be
added by way of layers that apply an effect such as change in color.
I particularly liked the effect of applying a gradient, like this
greyscale for a black and white look:
|
|
 |
One pitfall to avoid
and
realize though is that if you apply the lens flare on the background
image, the bright bloom and lens reflections will appear hidden and
masked by the shrubbery from the layer in front of it, Layer 1.
This is not very realistic looking. Lens reflections happen in the
lens, and appear in front of everything. You will want to use another
layer in the front to do this correctly.
|
|
 |
Or, we may be ready
to
flatten the whole thing and apply a final touch to the image by doing
the lends flare thing after that.
|
|
|
 |
Here's another
effect I
really liked: applying the inverted grescale gradient, it looks more
like a night scene in plain winter with snow on the branches.
|
|
|
 |
When you save your
flattened image, remember what you might want to do. If it's just so
you can reload it into PSE later, you might want to save it as the
default, Photoshop (PSD) format. Especially if you still have layers in
there.
If you plan on taking the flattened image into another program, such as
the free image viewer Irfanview
or a paint and animation program such as PD Pro, you
might want to use other formats, like Targa. Jpeg or Png would of
course be used if you plan to use this image in a website.
|
|
Shop
at Purplus
for
more great Software & gadgets, games, security tools and
productivity solutions at lowest prices!
|
|
 |
If you save to
Targa,
you'll be interested in keeping the truecolor nature of your image, so
save to 24-bit format. If you have a selection mask you want saved in
the alpha channel, consider using the 32-bts per pixel depth.
|
|
|
That's it. You
have seen an example for compositing an image over another. This
example had a selection mask around the image of the bushes. If
your example is different, perhaps as simply as just a solid rectangle
photo, just use the marquee or other tools to select the desired areas
of the image. Then Control-C to copy the desired portions of the
document and Control-V to a new layer of the other document.
This may not be the only way to achieve this, by-the-way. But it's one
that worked for me, so I wanted to share this information. I hope it
helps.
Below is an animation create from the last image, using PD Pro
(conversion from Avi to Flash in another tool)
|
|
|


 image on top, in a new layer, where the
new image carries a
transparency mask as a selection. Of course this can also be used in
simpler cases. PS Elements is a very powerful imaging application with
loads of capabilities. One approach shown here is to load each image as
its own document, and then create a new layer in the document which
contains the background image, and finally copy&paste the other
image into that layer, using a selection mask to keep the background of
the layer transparent so as to show the underlying image.
image on top, in a new layer, where the
new image carries a
transparency mask as a selection. Of course this can also be used in
simpler cases. PS Elements is a very powerful imaging application with
loads of capabilities. One approach shown here is to load each image as
its own document, and then create a new layer in the document which
contains the background image, and finally copy&paste the other
image into that layer, using a selection mask to keep the background of
the layer transparent so as to show the underlying image.