

Using Curvy together with PD Pro's Custom Brush

Also supports
3D Layers:
 |
After you're done
with sculpting
and modeling,
take your art
to the next level:
 |
 The perfect marriage: |
| Finally! 3D for everyone: Carrara (boxed) free shipping for orders $50 and up! (US only) Hurry before they're gone - this is a limited inventory blowout sale around $17 Carrara 3D Basics: so affordable!  around $40-$50 Carrara 3D Express: wow!  around $50-$60 Carrara 5 Standard: best value!  just around $100 Carrara 5 Pro: be a 3D Pro now!  |
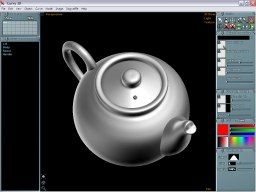
| Part 2 - add a second image to the Brush Use ALT+Tab to switch back to Curvy 3D now. Note that if the interface on the left and right side disappears and you only see the full 3D view, it's probably due to the Tab in the ALT+Tab sequence. Curvy lets you toggle the interface on and off with the Tab key. So, just hit Tab again, and the interface should be back.  Use the Orbit tool again (it should still be the currently selected tool) and select a different orientation. When you're ready and have the desired view angle, send it again to Dogwaffle like before, straight into the custom brush system.  Switch back to Dogwaffle (ALT+Tab). Now, if you wanted to keep this new view in a separate brush, you could simply do the same thing: STore & manage that brush.  However, there is another option: You can add the newly received brush image into the stored brush that we stored earlier. The filmstrip showed back then that it only had one image. The goal is to change that. After adding the new brush image to that stored brush, it will contain both the original and the new image. It will be an animated brush made of two images. 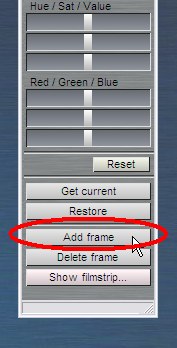 Click "Add frame" on the stored brush manager. That's the brush manager currently storing the first received brush image. The newly sent image, shich is in the active custom brush, can be added to the stored one. As expected, the FIlmstrip of that stored brush manager will now show the two views of the teapot.  Note that they can be at different sizes. The fact that they show with black background can be ignored, because there's also a transparency mask in their alpha channel. The background color may not show (and it won't, in this case) unless you re-key to a color instead of using the alpha channel that was sent from Curvy. If you look at the Brush manager's top thumbnail, it will now gently animate across the two images that the stored brush contains. Every two seconds you'll see the next image.  You have now seen the essential steps to add even more images, new frames, to this custom animated brush.
  After a few more, the FIlmstrip will contain a sequence of images of the teapot at various angles. 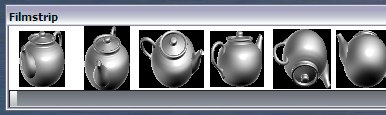 Next: Part 3 - Confetti Time! |
| Teapot
Confetti |
| part 1 |
| part 2 |
| part
3 |
| Beginner
Tutorials |
| Getting Started |
| Photoshop 3D Layers |
| Bones
101 |
| Teapot |
| Dogwaffle 101 |
|
|
| Can't afford PD Artist at $19?  Someone else will pay for your copy of PD Artist, if you buy something from them first - and there are many products and services to choose from! |
| Can't afford PD Particles at $19?  Someone else is willing to pay for your copy of PD Particles, if you buy something from them first - and there are many products and services to choose from! |
| Easy,
powerful & affordable 3D with Carrara 7  (download versions at DAZ3D based on v7) Carrara 7 Express Carrara 7 Standard Carrara 7 Pro |
| Getting
started with Digital Painting on a slim budget:  PD Artist Draw, Sketch, Animate & Paint powered by Project Dogwaffle
|