Tutorials:
|
intro - in the beginning, there was nothing but a blank
sheet of pixels
part 1 - getting started with Twisted
Brush Pro Studio
part 2 - Saving the image and
alpha
channel in a single file
part 3 - Loading an
image file straight to PD's Custom
Brush (w/Alpha)
part 4 - Loading an image and its Alpha Mask
from two files
part 5 - Discovering
new brushes:
Kaleidoscope!
part 6 - Painting
with Mandala brushes into AVI file to record as animation
part 7 - Mandala
brush animation with
animated multi-frame brushes
part 8 - The
animated Brush Timeline edtor
|
Mandala
Custom brush and animations
|
Now that we've
identified a whole universe of new brushes, the Mandala collections,
let's create a few and see you to take them further by way of
animation. In Project Dogwaffle, you can load an image and replicated
it in a frame sequence to then turn it into an animation by modifying
the frames through filters along the entire timeline (post FX). Or you
can transfer an image or image sequence into the custom brush as a
multi-frame animated brush, and modify that through it's own timeline
editor in ways similar to the regular Timeline editor which acts on the
main image bufer's frames. Once you've created an animated brush, you
can use it to paint on a single image or across all frames of a new
animation by holding down the ALT key while painting!
Creating
a few Mandalas
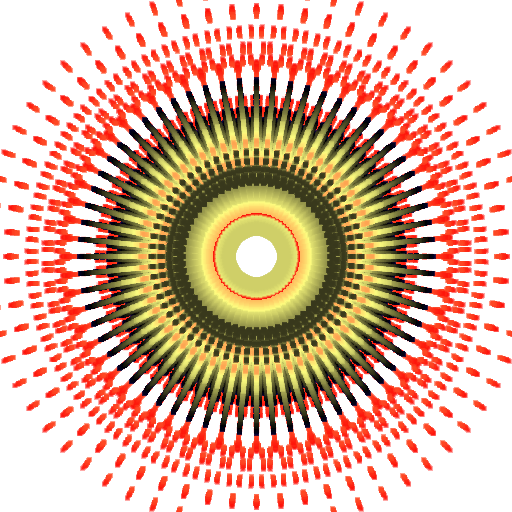
Here are a few creations made easily possible with Twistedbrush's
Mandala brushes.
Before painting them, you may want to set the image size to a square
aspect ratio and dimension you want to use in the brushes once they're
inside Dogwaffle.
|

Select the menu:
Page > Set Page
Size...
|
For example, set the Width and the Weight to 512 each
 |
Here are a few examples, shown in 150x150 thumbnails as Jpeg images but
they were saved as PNG files with their transparency masks in the alpha
channel. You can click any of these to see their respective original
image at 512x512 - feel fre to save these PNG files to experiment with
them in your own Dogwaffle session.
|
  
  
   |
Animated brushes? Got that covered too. This tutorial's part will show
how to make an animated brush from a single static image like those
shown above, but you could also start from an AVI file that was created
by capturing a few seconds of Mandala brush evolution in action. That
will be presented in a subsequent tutorial example.
|
Loading
the image in Project Dogwaffle
|
This is the easy,
straight forward way - into the main image buffer (in PD Pro 4 it could
also load into a stored image place holder for use later)
 Open
the file containing the Mandala image. Be sure to set the filetype to
Automatic so it can list and let you select the PNG file. (default only
shows Targa images) Open
the file containing the Mandala image. Be sure to set the filetype to
Automatic so it can list and let you select the PNG file. (default only
shows Targa images)
|
If you use Windows Explorer in Thumbs view mode while looking for the
PNG images, it will make it easy to see which one it is you're about to
load.
 |
If the image you opened is 32-bit deep because it also has the alpha
channel, you'll want to make sure that the Alpha channel is set to
enabled (i.e. visible). Indeed, you could otherwise be in the presence
of an alpha mask but without seeing it that makes it difficult to
understand what your dealing with.

from the Alpha menu, turn the alpha on:
Alpha > Alpha
on/off
After that there should be a checkmark on the left side of that menu
item if you've successfully turned it on.
Note that turning it off doesn't clear the alpha channel content, it
merely hides the effect of it, and thus also the marching ants.
|
Picking
up the image through the alpha mask as Custom Brush

Perhaps the fastest way to pick up the portion of the image which is
confined within the selection as shown in the alpha channel, is to use
this option:
Brush > Use
selected as brush
|
Note that in this
manner it picks up only the area which is inside the bounding box of
the alpha selection mask. If the mask reaches to the edge it's the same
size as the image you loaded. But if the alpha is of smaller
dimensions, then the image in the brush will be smaller. It will have
the dimensions defined by the bounding box of the selection.
Of course you don't have to depend on a selection mask being there. You
can pick the entire image into the brush in this manner if you don't
have an alpha mask, e.g. if you first clear alpha (Ctrl-D). Or you
could in fact define a selection, in hundreds of different ways,
including by painting a selection mask over the underlying image, or by
using the lasso cursor and magic wand and more tools.
Store your Custom Brush
|

We can't emphasize this often enough: always store your newly created
custom brush, before you start using this and other brushes and
accidentally have it replaced with another custom brush image.
Brush > Store /
manage...
use keyboard shortcut: " (the double-quote)
Storing it also lets you manage it for what's coming next.
|

Once you've stored the image, you can simply click the thumbview image
even after using other custom or build-in image based brushes which
also happen to use a custom image.
You can alsograb the corners of the floating window of the stored brush
manager, and resize it to better see the details
Making the window wider also helps in enhancing granularity and fine
control of the slider's values. This is particularly useful when you're
trying to get it into a particular angle. Of course thre are other ways
to transform a brush image, from the Brush menu directly. But that
would not transform the stored image, just the actively loaded custom
brush currently in use. You'd always want to store that one too
if you mean to keep using it.
|
You can also use the keyboard shortcut which is at the very heart of
Dogwaffle's custom brush philosophy:
'b' for brush
and use therefore the custom brush pickup tool in order to pick
up a
rectangular portion of your choosing, or all of the image. The
transparency eying for the brush is normally done based on the
secondary color, but if there's a selection mask found present in the
alpha channel, then it will use Alpha for keying transparency. |
Turning
the Image into a Custom Animated Brush
We'll assume that the original image which was loaded from the PNG file
is still present, and with its alpha selection mask present and
enabled. You can use this as s starting point to turn it into a simple
animation:

Select 'Create' from the animation menu:
Animation > Create
|
Select the desired
number of frames, and make sure that it doesn't initialize to the
simple, plain background colro (Secondary color). Instead, it needs to
initialize it from the current image. That's actually the default. So
just set the frame quantity and click OK to create the animation.
This will create an image sequence of identical frames containing your
image. Of course, not much of an animation to see there yet, as all
frames contain the same identical image at this point. The alpha
channel is not crucial so far for this but in the next phase it is:
You're no going to pick up the entire frame sequence (the animation)
into a new custom brush, i.e. an animated brush.
 use
the Custom brush pickup tool (or press 'b') use
the Custom brush pickup tool (or press 'b')
Make sure you're looking at the first frame (or whichever frame you
want to tart from). The tool will be used to pick up all frames from
the current to the last. The alpha mask, if enabled, will be used for
kying.
You can either set your pickup rubberband box to contain a portion or
all of the image. If you want to make sure you grab it all, you should
first make the image's window larger soas to reveal the grey area
around it. You can then select around the whole image buffer size, and
pick it up.
How to pick up all
frames: (IMPORTANT!)
There is only one trick left: by default, the
custom brush pickup tool would use just the current image in which you
pick up the rectangular region. Instead:
Use the ALT key to pick all frames
You don't need to have the Alt key down whenn you start your
rectangular selection, but you need it down when you release the mouse
button at the end of your selection once the rectangular rubberband box
has the desired dimention. If Dogwaffle sees that Alt is down at that
moment, then it will pick up all frames from the current to the end
ofthe animation and transfer the selected ones into the custom animated
brush.
|

You should see the frame counter at the top of the window bar go
through all frames per your selection.
As soon as it's done, you should store this new custom brush:
Verify that it picked up all desired frames:
Click the Show FIlmstrip button
|
Here's an example of
the filmstrip, showing thumbnails of the captured and stored custom
animated brush. In this example, there's no change yet between frames
so you don't see an animation progress really. That's about to change
though as we'll do some things to change the images in these frames.
 |
|
|